Getting Started
About
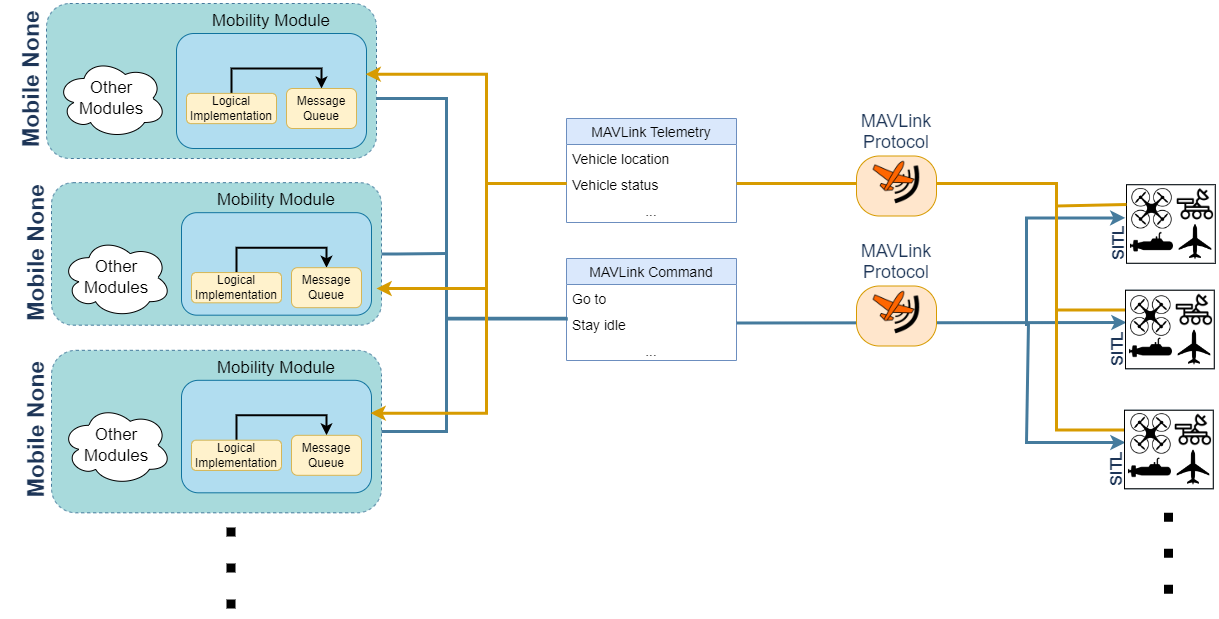
MAVSIMNET is a simulation framework for the OMNeT++ discrete event simulator based on Ardupilot's Software In The Loop (SITL) simulator. It allows you to enrich OMNeT++ and INET's simulations with realistic mobility models for the mobile nodes in your network.
It works by spawning SITL instances that provide a physical simulation of the vehicle's behaviour and connecting them to the mobility classes in your simulation. A user can transparently use these mobility modules without worrying about the details of the communication and messages being exchanged between the network simulator and the SITL instances and a developer can use the strong interface provided in the project's base mobility class to implement his own mobility modules.
Installation
- Clone the github repository.
git clone https://github.com/Thlamz/MAVSIMNET/
- Make sure you have INET installed in your workspace. If you see a directory named inet4.5 in your workspace you can skip this step. Note that the directory should be named inet4.5 and not something else. If the name of your inet package is different due to multiple versions make sure that you select the correct inet package in project references (Settings -> Project References -> Select correct INET version). The project required INET version 4.5.
- Add the project to your OMNeT++ workspace. You can do this by following the steps in File > Import... > General > Existing Projects into Workspace. The root folder should be the folder you cloned in the first step.
- Download the compiled SITL simulator for each vehicle type you want to use. Save the paths to these files as you will need them later. Binaries can be found on ardupilot's firmware website. These are the binaries for the most common platforms and supported vehicles:
| Vehicle | Windows | Linux |
|---|---|---|
| Copter | Link | Link |
| Plane | Link | Link |
| Rover | Link | Link |
- Write or download parameter files for the vehicle types you want to use. Save the paths to these files as you will need them later. We recommend donwloading the default parameter files from here:
| Vehicle | Location |
|---|---|
| Copter | Link |
| Plane | Link |
| Rover | Link |
To verify you have completed the installation successfuly run the randomwaypoint showcase present in the showcases folder.
WARNING: You will need to modify the .ini file for this simulation and any other that you run to include your SITL installation paths and parameter file paths for each type of vehicle that you want to use. You should have downloaded these files on steps 4 and 5. Further instructions can be found in the Usage section.
Usage
The mobility modules available in this framework are instances of INET mobility modules. If you do not know what those are or how to use them you can check INET's documentation. There you will learn how to set up a simulation environment, populate it with nodes and set them up with mobility modules. After your simulation is set up there is only a couple things you need to worry about.
A very important thing to take note of is that your simulation has to use INET's Real Time Scheduler. This guarantees that the SITL instances and OMNET++ are syncronized. You can set this up in your .ini file with this line:
scheduler-class = "inet::RealTimeScheduler"
WARNING: If you are on windows and using INET version 4.2.5 or lower INET will not compile if you use inet::RealTimeScheduler with the Clang compiler. You will need to compile OMNeT++ with gcc. To do this change the value of the
PREFER_CLANGparameter to "no". In the configure.user change the line toPREFER_CLANG=no. After doing this run these commands in mingw:
make clean
./configure
make
Using the available mobility modules is as simple as setting your node's mobility module. You can do this with the following command, using the RandomWaypointMobility module as an example:
*.client[*].mobility.typename = "MAVLinkRandomWaypointMobility"
After placing this module in your simulation you need to set up the paths to the SITL simulators for each vehicle type supported. Currently you have to set up the copterSimulatorPath, planeSimulatorPath and roverSimulatorPath parameters. These are the paths to the files you have downloaded in step 4 of the installation, more specifically the path to the simulator binaries (.elf file on windows and extensionless file on linux). For example, if you ara on windows and have placed the copter simulator in the CopterSimulator file of the root directory of your C: drive, the parameter should be set to:
*.client.copterSimulatorPath = "C:\\CopterSimulator\\ArduCopter.elf"
Notice the escapes characters as windows uses back-slashes in paths.
INFO: If you are not using a vehicle type you can leave the path for that vehicle's simulator as an empty string.
After setting this up you need to pay attention to the module's required parameters. Those can be found in the module's documentation page. Remember to pay attention if the module extends another one, as the required fields for the latter will also need to be filled.
In general the parameters you need to fill when using any of the MAVSIMNET mobility models are:
| Parameter | Type | Description |
|---|---|---|
| vehicleType | int | MAVLink type of vehicle that this class represents (COPTER=1, PLANE=2, ROVER=4) |
| paramPath | string | Path for the parameters for this vehicle. These are the parameters you downloaded in step 5 of the installation. Do not use parameters for a different vehicle type |
That is all you need to know if you plan to use this framework's existing modules with no modifications. If you plan on expanding upon it of modifying the modules there are a few more things you should be aware of.
Development
There are two important modules in the repository's utils folder that are useful for developers.
The VehicleRoutines module offers several utility functions that simplify common tasks using the MAVLink protocol. These functions generate a vector of instructions that should be queued using MAVLinkMobilityBase's queueInstructions function.
The other important module is the TelemetryConditions module. As explained in the MAVLinkMobilityBase documentation messages are dispatched to the SITL instance using a message queue. This message queue moves only when the front-most message is concluded. What defines a message as concluded is a function, called a Condition, that gets called on every telemetry received. This allows a developer to define the condition that needs to be fulfilled before the next message in the queue is sent. A takeoff message could wait for the vehicle to reach a certain altutde, for example. The TelemetryRoutines module has some ready-to-use conditions for these situations.